Ashes of the Damned is the one and only Zombies map available at launch for Call of Duty: Black Ops 7. In this article, we’ll show you exactly how to unlock the much sought-after Pack-a-Punch — which is completely mobile thanks to Ol’ Tessie, your trusty truck. This new twist makes upgrading weapons on the go easier than ever, letting you stay powered up no matter where the undead attack. Here’s everything you need to know about unlocking the Pack-a-Punch machine in Ashes of the Damned.
Note: Boost Your BO7 Progress Fast – U4GM’s Safe BO7 Bot Lobbies Give You the Edge
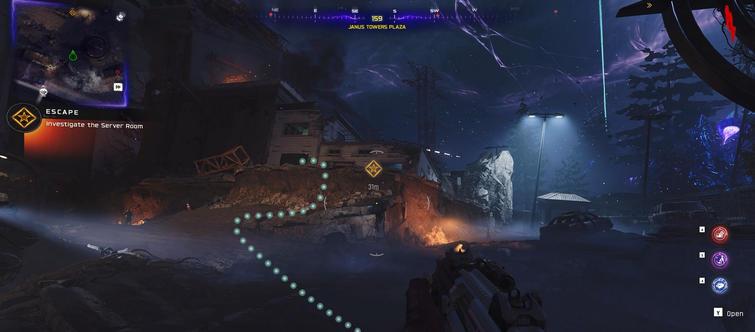
Step 1: Investigate the Server Room
When you begin, you’ll spawn in Janus Towers Plaza (indicated on your compass) with the direction to Investigate the Server Room.
The Server Room door costs 1,250 Essence, so you’ll need to farm some zombies to earn the cash. Once you’ve gathered enough, buy the Server Room door.
On the floor to the right, you’ll spot a small grate — melee it to reveal T.E.D.D.’s Head, the first key item on your journey.
Grab it, then head outside toward the marker to find Ol’ Tessie, your ride for this map. Approach Tessie and hold the interact button to install T.E.D.D.’s Head.
Step 2: Drive to Blackwater Lake
With T.E.D.D.’s Head installed, it’s time to take Ol’ Tessie on her first drive. Once you’re clear of zombies, hop in the truck and take an immediate left toward the marker.
Crash through the wooden fence and keep driving to the newly revealed marker pointing you toward Blackwater Lake.
Important: When traveling between zones, special zombies will attack you as you drive. Stay in the truck!
These zombies can quickly take you down, so keep driving as fast as possible to avoid breaking down in these dangerous areas.
While driving, you’ll notice orange clusters on the road — avoid them, as they explode and damage Tessie.
Her health bar is shown at the bottom center of the screen.
If you see yellow clusters, those will heal her. Don’t go too far out of your way for them, but grab them if they’re nearby.
Step 3: Restore Power at Blackwater Lake
As you make your way through Monolith Forest, you’ll eventually come across another fence with a Blackwater Lake sign above it. Crash through it to enter the zone.
Here, you can safely exit Ol’ Tessie. Follow the quest marker labeled Restore Power to reach a Power Pump, where you’ll need to clear the infestation. This part can be tricky, as it’s on a strict timer. The timer doesn’t start until you fire your first shot at the pump, so make sure you and your squad are ready and not overwhelmed by zombies.
Once you’re set, shoot the orange clusters around the pump to begin the 30-second countdown. Circle around the pump, destroying the infestation clusters as quickly as possible.
When all are destroyed, one final large cluster will appear on top — focus your fire until it explodes. If you fail, you’ll need to wait for the next zombie round to reset before trying again.
After you succeed, follow the wire from the pump into the cabin and up to the top floor to turn the power back on. The cabin door costs 1,750 Essence, which you should easily have by now.
Step 4: Drive to Ashwood
Once the power is back on, hop back into Ol’ Tessie for another ride — this time to Ashwood, the final zone covered in this guide.
Drive through the special zombie zone again, following the on-screen markers until you arrive in Ashwood.
When you reach the area, you’ll see several quest markers. Exit Tessie in front of the large garage, then look across from it to find a zipline heading upward.
Ride it up and approach the locked door on your right, which costs 1,000 Essence to open.
Continue through to find floating debris blocking the path — this costs 1,750 Essence to clear. You may need to farm a few zombies to afford it, but once you do, continue forward to find another infected Power Pump.
Step 5: Restore Power at Ashwood
Just like before, be prepared to clear the Power Pump within 30 seconds.
Once cleared, follow the marker to the perch above the pump and turn the power back on. After restoring power, look to your right to find an opening that will quickly get you back down to Tessie.
Once on the ground, hop back into the truck. The garage door will open automatically, allowing you to drive Tessie inside.
Step 6: Install the Pack-a-Punch
After parking inside the garage, a final marker will appear, directing you toward the Pack-a-Punch Upgrade on a nearby bench. Interact with it to install the Pack-a-Punch on the back of Tessie.
And voilà, you now have access to a mobile Pack-a-Punch that you can use anytime you have Tessie with you. Not only that, but installing the Pack-a-Punch also gives Tessie a speed boost, making those special zombie zones a bit easier to get through.